
These buttermilk chicken tenders are the real deal. A quick soak in buttermilk and a double dredge through seasoned flour gives you a crust that’s thick, crispy, and flakey in all the right ways. Juicy on the inside, golden on the outside. This is the recipe that raises the bar on homemade chicken tenders.
More chicken tender recipes:

The Keys to Nailing This Recipe
A few things make the real difference here. Get these right and the rest takes care of itself.
-
Don’t rush the buttermilk soak.
At least 1 hour, but 2 to 4 hours is better. The acid breaks down the proteins in the chicken for tender, juicy meat instead of something dry and chewy. -
Use the double dredge.
Flour, then egg wash, then flour again. That second pass through the flour is what builds the thick, flakey crust these are known for. -
Get the oil to 360–365°F first.
If the oil isn’t hot enough before the chicken goes in, the breading absorbs oil instead of crisping. That’s how you end up with soggy tenders or coating that falls off.
How to Make Buttermilk Chicken Tenders
Here’s a quick look at what’s in this recipe, then we’ll walk through it step by step. The ingredient list is short and there’s a good chance you’ve already got most of it on hand.
Step 1: Cut and Pound the Chicken
Cut the chicken breasts into strips about an inch wide, cutting against the grain when you can.
Then lightly pound each strip to an even thickness of about ½ inch. This ensures even cooking and starts tenderizing the meat before the buttermilk even gets involved.
✦ Chicken breast tenderloins work great here too if you can find them in the meat case. They’re already the right size and shape. Just trim the tendon end if it’s visible and you’re ready to go.

Step 2: Marinate in Buttermilk
Combine the chicken strips, buttermilk, and half the seasoning blend in a bowl. Mix well so everything is coated.
Cover and refrigerate for at least 30 minutes, up to 4 hours if you have the time. The longer it soaks, the more tender and flavorful the result.
✦ Buttermilk does more than you’d think. The mild acidity breaks down the muscle proteins in the chicken, which is what gives you tender, juicy meat rather than something dry and tough. It also adds a subtle flavor that works perfectly with the seasoned breading and helps the batter stick during dredging.

Step 3: Set Up Your Breading Station
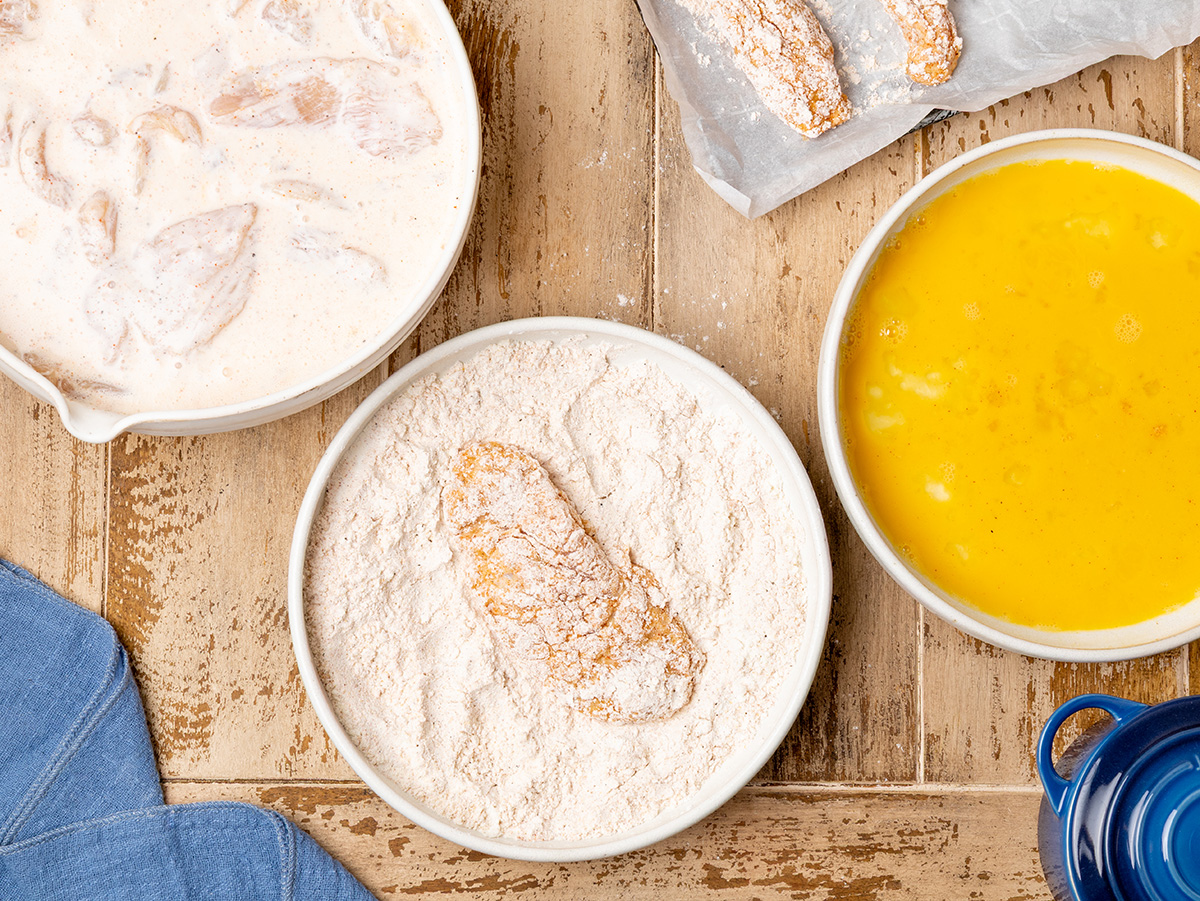
In a shallow dish, whisk together the flour, cornstarch, and remaining seasoning blend. In a separate bowl, beat the egg.
You’ll be moving the chicken from buttermilk through both bowls, so set them up in order.
✦ The cornstarch is the secret to that extra-crunchy crust. It limits gluten development in the coating, which keeps it light and crisp rather than dense and bready.
Step 4: Double Dredge the Chicken
Remove the chicken strips from the buttermilk one at a time. Dredge each strip through the flour mixture and shake off the excess.
Dunk it into the beaten egg and let the excess drip off. Then back through the flour one more time, pressing gently to help the second coat stick.
Set the coated strips aside on a plate or wire rack until all the chicken is ready to fry.
✦ Press the second coat on. Don’t just dust and shake. Gently pressing the flour onto the strip is what gives you a thick, flakey crust. Thin spots are where the breading falls apart.

Step 5: Fry Until Golden
Add 2 to 3 inches of vegetable oil to a deep skillet or Dutch oven and heat to 360–365°F. Carefully add the chicken strips to the hot oil without crowding the pan.
→ Work in batches if needed, as overcrowding drops the oil temperature and leads to soggy breading.
Fry for 3 to 4 minutes per side, about 6 to 7 minutes total, until deep golden brown and cooked through. Internal temperature should reach 165°F on an instant-read thermometer.
As soon as each batch comes out, give the tenders a light sprinkle of kosher salt while they’re still hot. It makes a difference.
✦ Check the oil temp between batches. It drops when cold chicken goes in and takes a minute to recover. Frying in too-cool oil is the fastest way to end up with greasy tenders that don’t crisp up.

Step 6: Drain and Serve
Remove the chicken from the oil and drain on paper towels. Let them sit for a couple of minutes before serving. This lets the crust set up and keeps the juices inside.

Serving Ideas
These tenders work great as a main or a starter, and they pair well with almost anything. A good dipping sauce is basically required. Honey mustard, BBQ sauce, and ranch are the classics and any of them hit the mark.
For sides, keep it simple and satisfying:
- Fries: Air Fryer French Fries are a natural fit and come together fast.
- Coleslaw: Country Creamy Coleslaw is the kind of cool, creamy side that balances out the crispy and savory.
- Mac and cheese: Hard to go wrong. Baked Mac and Cheese is the comfort food move.
- Vegetables: Roasted Garlic Parmesan Broccoli rounds things out if you want something on the lighter side.
✦ Want to mix up the flavor? Air Fryer Honey Chipotle Chicken Tenders uses a sweet and spicy marinade instead of the classic buttermilk batter. Great for when you want something with a little more kick.
Storage and Reheating
Refrigerator: Store in an airtight container for up to 3 days.
Reheating: For a crispy result, use the oven or air fryer. Spread the tenders on a baking sheet and bake at 375°F for about 10 minutes, or air fry at 375°F for 5 to 6 minutes. The microwave works in a pinch but the breading will soften.
Freezer: Let the tenders cool completely, then freeze in a single layer on a baking sheet for about an hour before transferring to a zip-top bag. They’ll keep for up to 2 months. Reheat from frozen in the oven at 375°F for 15 to 20 minutes, flipping halfway through.
FAQs
How long should you soak chicken in buttermilk?
At least 30 minutes, but 2 to 4 hours gives you noticeably better results. The longer soak gives the buttermilk more time to tenderize the chicken and work flavor into the meat. You can push it to overnight in a pinch, though anything beyond 12 hours can start to affect the texture.
Do you rinse the chicken after soaking in buttermilk?
No. Just pull the chicken out of the buttermilk and let the excess drip off before dredging. Rinsing washes off the thin coating that helps the flour and egg stick during the double dredge, which works against you
What does buttermilk actually do to chicken tenders?
Two things. First, the mild acidity breaks down the proteins in the chicken, which is what gives you tender, juicy meat instead of something dry and tough. Second, it adds flavor. A subtle tang that works perfectly with the seasoned flour coating. It also helps the batter cling during the dredging process.
Can you use regular milk instead of buttermilk?
You can make it work. Add 1 tablespoon of white vinegar or lemon juice to 1 cup of milk, stir, and let it sit for about 5 minutes. The acidity isn’t quite as strong as real buttermilk, so the tenderizing effect will be a little milder, but it’s a solid substitute in a pinch.
Why is my breading falling off?
Usually one of two things: the oil wasn’t hot enough when the chicken went in, or the second coat of flour didn’t stick well. Make sure the oil is at 360–365°F before any chicken hits the pan. When you do the double dredge, press the second coat on gently so it adheres. Both of these make a real difference.
More Crispy Chicken Worth Making
- Air Fryer Hot Honey Chicken
- Air Fryer Chicken Wings
- Oven Baked Chicken Parmesan
- Air Fryer Chicken Cutlets
- Hot Honey Chicken Sandwiches
- Buttermilk Spicy Chicken Sandwich

Best Damn Buttermilk Chicken Tenders
- Total Time: 55 mins
- Yield: 2-4 servings
Description
Boneless chicken breast, soaked in a seasoned buttermilk marinade and double-dredged through a flour and cornstarch coating, then fried until thick, crispy, and golden. These are the homemade chicken tenders that actually deliver.
Ingredients
- 1 lb boneless, skinless chicken breasts, cut into strips
- ¾ cup buttermilk
- 2 tsp kosher salt
- 1 tsp garlic powder
- 1 tsp onion powder
- 1 tsp paprika
- ½ tsp black pepper
- ⅛ tsp cayenne pepper (optional)
- ½ cup all-purpose flour
- ¼ cup cornstarch
- 1 large egg
- Vegetable oil for frying
Instructions
- Cut chicken breasts into strips about 1 inch wide, cutting against the grain when possible. Lightly pound each strip to an even thickness, about ½ inch.
- In a bowl, combine the chicken, buttermilk, and half the seasoning blend. Mix well to coat. Cover and refrigerate for at least 30 minutes, up to 4 hours.
- In a shallow dish, whisk together the flour, cornstarch, and remaining seasoning blend. In a separate bowl, beat the egg.
- Remove chicken from the buttermilk one piece at a time, letting the excess drip off. Dredge in the flour mixture, dip in the egg, then coat again in the flour mixture, pressing gently so the second layer adheres. Set aside while you coat the remaining pieces.
- Add 2 to 3 inches of vegetable oil to a deep skillet or Dutch oven and heat to 360–365°F. Fry chicken in batches for 3 to 4 minutes per side, about 6 to 7 minutes total, until deep golden brown. Internal temperature should reach 165°F.
- Transfer to a paper towel-lined plate to drain. Sprinkle lightly with kosher salt while still hot. Serve immediately.


Notes
The Buttermilk Marinade
- Combine chicken, buttermilk, and half the seasoning blend. Minimum 30 minutes; 2 to 4 hours is better. Overnight works, but don’t push past 12 hours.
- Do not rinse the chicken after marinating. The coating helps the flour and egg stick.
- The seasoning blend splits in half: half goes into the marinade, half into the flour mixture.
Frying Tips
- Get the oil to 360–365°F before any chicken goes in. Too cool and the breading absorbs oil instead of crisping.
- Fry in batches. Crowding drops the oil temp and leads to uneven results.
- Double dredge: flour mixture, egg, flour mixture again. Press the second coat on gently.
- Sprinkle lightly with kosher salt as soon as each batch comes out of the oil.
Substitutions
- Buttermilk substitute: 1 cup milk + 1 tablespoon white vinegar or lemon juice. Let sit 5 minutes before using.
- Using pre-cut tenderloins instead of breast: trim the tendon end and skip the pounding step.
- Cayenne is optional but adds a nice subtle heat. Start with ⅛ tsp and adjust from there.
Storage
- Refrigerate in an airtight container for up to 3 days. Reheat in the oven or air fryer at 375°F.
- To freeze: cool completely, freeze flat, then bag. Reheat from frozen at 375°F for 15 to 20 minutes, flipping halfway.
- Prep Time: 15 mins
- Marinating Time: 30 mins
- Cook Time: 10 mins
- Category: Dinner
- Method: Frying
- Cuisine: American

Want more recipes that turn out right?
Subscribe and Get My New Cooking with Confidence E-Book — FREE!


Donna says
Can these be made in a deep fryer and may I ask what season salt is.
RecipeTeacher says
Hi Donna. Season salt can be found in almost any supermarket spice/seasonings section. Lawry’s is probably the most popular/common brand. It’s basically salt and a mixture of a few other seasonings. To answer your other question – absolutely you can make them in a deep fryer.
Lynda Trumpower says
Can you adapt this recipe to the Ninja foodie air fryer, please.
RecipeTeacher says
Hi Lynda, yeah I’m actually gonna be doing that soon. Thank you for the feedback.
Maebe says
Can it be oven baked instead of frying?
Amanda says
I’m sure the recipe is fine….but omg I can not fry chicken to save my life! Someone please help me. I do not know what I’m doing wrong. I thought it was because I used frozen chicken that I had thawed and the chicken was wet so I dried it with paper towels. That did not help. But, my problem is that when I make any fried meat (chicken, pork chops) my coating comes off as soon as you cut into to take a bite, like a glove. The entire outside comes off and it’s like a plain piece of meat. I have pictures. WHAT AM I DOING WRONG?!? ????????????
Taylor says
I used to have the same problem! I think my issue was not having the oil hot enough, but this time I tried the trick with adding flour and waiting for it to sizzle and it came out beautifully. When I put the coating on, I also sort of pressed it on to help it stick. I also did an additional egg/flour dip for the ones that didn’t look sufficiently coated before frying. I failed at this multiple times before being successful so just keep trying! You can do it!
angela says
could these be made in an air fryer?
RecipeTeacher says
Hi Angela, I’ve not tried these in an air fryer but from what I hear, wet battered and buttermilk battered foods can be tricky in an air fryer. I’m actually getting one soon and hope to have instructions once I get the hang of it.
Samantha says
Indeed the title lived up to its name. My family loved them so much I had to cook more the next day.
RecipeTeacher says
Awesome!!! So glad you enjoyed. Thanks for the feedback, Samantha!